![]()
Flagging
Flagging allows a site visitor to flag a piece of content and provide feedback. Flagging enables your site visitors to moderate your site. This is especially important for sites with large amounts of visitor-generated content. Flagging also helps site visitors feel invested in the site.
For example, you create a flagging definition with the following options that let your site visitors decide if content is inappropriate.
Sexually Explicit
Mature (over 18 only) content
Graphic Violence
Hate Speech
Flagging can also be used to let site visitors leave an opinion about a content item. Below is a sample list of options.
Loved This Content
Hated This Content
I Could Take It or Leave It
Flagging is similar in function to the ContentReview server control. The main differences are
Flagging feedback is not displayed on the site
The Flagging control provides a user-defined list describing the reason for the flag
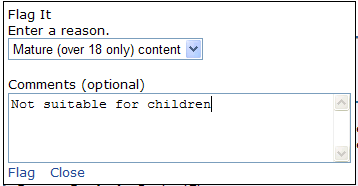
So, a flagging definition describes how a content item may be reviewed, and provides a list of choices that may be applied to content in a folder. Here is what one might look like on your site.
After you create a flagging definition, you assign it to relevant folders. All content in the folders can then be flagged with that definition.
As the final step in allowing site visitors to flag content, a developer must add a ContentFlagging server control to a Web page, and assign to it the ID of the content being flagged. See Also: ContentFlagging Server Control.
Flagged content appears in the following Workarea locations.
Content Flags list on the Smart Desktop
Settings > Community Management > Flagging > Flagged Content
a content item’s View Content Reports > Flagging tab
Flagging Definitions
The Flagging Definitions screen is located in the Workarea > Settings > Community Management > Flagging. From here, you can view a list of flagging definitions, work with them, or create new ones. In addition, you can filter the list by language.
This screen contains the following information about a flagging definition.
|
Field |
Description |
|
ID |
The ID of the flagging definition. |
|
Name |
The name of the flagging definition. |
|
Description |
A description of the flagging definition. |
|
Language |
An image of a national flag associated with the language. For example, American English appears as |
|
Items |
The number of flags in a definition. For example, if you have a flag definition for these movie ratings: G PG PG-13 R The items count for this definition is four. |
 .
.This section contains the following topics.
Deleting a Flagging Definition
Assigning a Flagging Definition to a Folder
Adding a Flagging Definition
To create a flagging definition, follow these steps.
1. In the Workarea, navigate to Settings > Community Management > Flagging > Flagging Definitions.
2. Select a language with which the flagging definition will be associated.
3. Click Add ( ).
).
4. The Add Flagging Definition screen appears.
5. Enter a Name and Description for the flagging definition.
6. Click Option () to add a flag to this flagging definition.
7. Continue to click the Option button to add additional flags.
8. If necessary, change the order of the flags by clicking the Sorting buttons ( ). If you create a definition you want to remove, click Remove (
![]() ).
).
9. Click Save ( ).
).
Edit a Flagging Definition
To edit a flagging definition, follow these steps.
1. In the Workarea, navigate to Settings > Community Management > Flagging > Flagging Definitions.
2. Click the flagging definition Name link or the ID link.
3. Edit the options. If desired, you can change the order of the flagging options by clicking the Sorting buttons ().
4. Click Save ().
Deleting a Flagging Definition
When you no longer want to use a flagging definition, delete it. When a flagging definition is deleted, it is removed from all folders with which it is associated.
To delete a flagging definition, follow these steps.
1. In the Workarea, navigate to Settings > Community Management > Flagging > Flagging Definitions.
2. Click the flagging definition Name link or the ID link.
3. Click Delete ( ).
).
Assigning a Flagging Definition to a Folder
After creating a flagging definition, you assign it to one or more folders. When you do, the flagging definition may be applied to content in that folder.
Like other folder properties, a folder’s flagging definitions may be inherited by its child folders, although this does not occur by default.
To assign a flagging definition to a folder, follow these steps.
1. Create a flagging definition, as explained in Adding a Flagging Definition.
2. Click the Content tab on the Smart Desktop.
3. Navigate to the folder that contains the content that may be flagged.
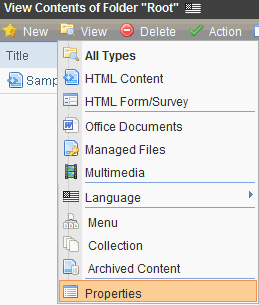
4. Select View > Properties from the View menu.
5. The View Properties screen appears.
6. Click Edit ( ).
).
7. Click the Flagging tab.

8. Make sure the Inherit Parent Flagging Configuration check box is not checked.
9. Select a flagging definition from the Flagging drop down.
10. Click Save ().
Flagged Content
There are three places in the Workarea to work with flagged content.
The Smart Desktop, which indicates the most recent flags applied to any content. See Content Flags on the Smart Desktop.
Settings > Community Management > Flagging > Flagged Content shows all flagged content. See Flagged Content in Settings > Community Management.
A tab on the Content Reports screen displays a list of content flags for a specific content item - See Viewing a Content Item’s Flags.
Flagged content is more fully explained through the following topics.
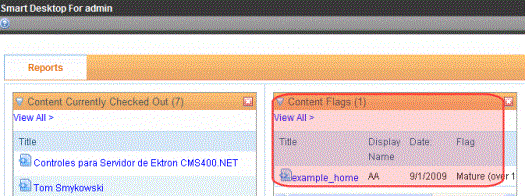
Content Flags on the Smart Desktop
Flagged Content in Settings > Community Management
Viewing a Content Item’s Flags
Content Flags on the Smart Desktop
This area lists the ten most recently added content flags. From there, you can view a flag by clicking its Title.
To view all recent flags, click the View recent flags link. Clicking this link takes you to the Content Reports: Recent Flags screen. See Also: Flagged Content in Settings > Community Management
Flagged Content in Settings > Community Management
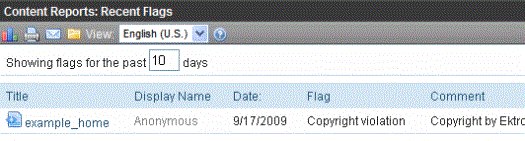
The Flagged Content area in Settings > Community Management > Flagging > Flagged Content allows you to display a list of flags assigned to content. By default, the list shows flags for the last ten days. You can change this by entering a new number in the Show flags for the last # days field.
See Also: Flagging

The information for each flag is explained in this table.
|
Field |
Description |
|
Title |
The title of the content block being flagged. Clicking this link brings you to a detailed description of the content’s flag. |
|
Display Name |
The name of the user who flagged the content as it is displayed on the Web site. |
|
Date |
The date the content was flagged. |
|
Flag |
The specific flag from the flagging definition for this content. |
|
Comment |
Comments added by the site visitor who flagged the content. |
From this screen, you can perform the following actions:
View the details of a submitted content flag - see Viewing a Flag’s Details
Generate a Flagged Content report - see Generating a Flagged Content Report
Print a list of flagged content - see Printing a List of Flagged Content
Filter flagged content by folder - see Filtering Flagged Content by Folder
Filter flagged content by language - Filtering Flagged Content by Language
Generating a Flagged Content Report
By default the Content Reports: Recent Flags screen shows content flagged within the last ten days. To view a different date range, follow these steps.
1. In the Workarea, navigate to Settings > Community Management > Flagging > Flagged Content.
2. In the Showing flags for the last # days field, enter a new number of days for which to show Flagged Content.
3. Click Report ( ).
).
4. The page refreshes and displays the new report.
Printing a List of Flagged Content
On the Content Reports: Recent Flags screen, you can output the flagged content report to a printer by clicking Print ( ). This creates an HTML version of the list that opens in a browser. From there, you can print the list using the browser’s print options.
Filtering Flagged Content by Folder
From the Content Reports: Flagged Content screen, you can filter flagged content by folder. This allows you to see flagged content for one folder. To do so, follow these steps.
1. In the Workarea, navigate to Settings > Community Management > Flagging > Flagged Content.
2. Click Filter ( )
)
3. The Select Folder screen appears.
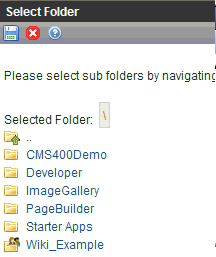
4. Select a folder.
5. Click Save ().
6. The page refreshes, and any flagged content in the folder is shown.
Note: Only flagged content that falls within the time frame for the Showing flags for the past # days field is shown. For example, if the field is set to five when you filter by a folder, only content that’s been flagged in the last five days appears.
Filtering Flagged Content by Language
To see flagged content for a specific language, select the language from the Language drop down box. When the page refreshes, only flagged content associated with the language appears.
Viewing a Content Item’s Flags
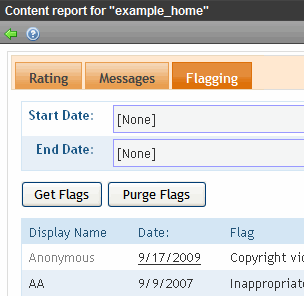
You can also view flags for a specific content item. To see them, go to the Content Report screen > Flagging tab. From this screen, you can filter flags by a date range or see all flags associated with the content.
In addition, this screen contains a purge button, which allows you to remove all flags associated with this content. This subsection contains the following topics:
Viewing Flags Applied to a Content Item
Purging a Content Item’s Flags
Viewing Flags Applied to a Content Item
Follow the steps below to get flags for a content item.
1. In the Workarea, find the content block for which to retrieve content flags.
2. Click the title of the content block.
3. The View Content screen appears.
4. Click Content Reports ().
5. Click Select Date ( ) next to Start Date to select a start date.
6. Click Select Date () next to End Date to select an end date.
Note: To retrieve all flags for a content item, leave the Start Date and End Date blank.
Note: To remove a Start Date or End Date, click Delete Date ( ).
).
7. Click Get Flags.
8. A list of flags applied to that content within the selected date range is displayed.
Purging a Content Item’s Flags
If you need to delete flags for a content item, follow these steps.
1. In the Workarea, find the content block for which to purge content flags.
2. Click the title of the content block.
3. The View Content screen appears.
4. Click Content Reports ().
5. Click Select Date ( ) next to Start Date to select a start date.
6. Click Select Date () next to End Date to select an end date.
Note: To purge all flags for a content item, leave the Start Date and End Date blank.
Note: To remove a Start Date or End Date, click Delete Date ( ).
).
7. Click Purge Flags.
8. The flags are removed.
Viewing a Flag’s Details
Viewing a flag’s detail information allows you to read the entire comment if it is truncated in one of the lists. You can also edit or delete a flag from this screen.
To view detailed flag and comment information, follow these steps.
1. Navigate to one of these area in the Workarea:
- Smart Desktop > Content Flags widget
- Settings > Community Management > Flagging > Flagged Content
- Reports > Contents > Content Flags
2. Click either a flag’s content title or the flag’s date.
3. The flag’s detail information appears.
See Also: Editing a Flag’s Details; Deleting a Flag
Editing a Flag’s Details
Editing a flag allows you to change the flag’s selection or the comments for a flagged content item. This can be useful if a user selects a flag by mistake, or you want edit a flag’s comments. For example, a user selects the “Offensive Content” flag but he meant to click “Copyright Violation”.
To edit a flag or its comment information, follow these steps.
1. Navigate to one of these area in the Workarea:
- Smart Desktop > Content Flags
- Settings > Community Management > Flagging > Flagged Content
- Reports > Contents > Content Flags
2. Click either a flag’s content title or the flag’s date.
3. The flag’s detail information appears.
4. Click Edit ().
5. Change the flag or edit the comments.
6. Click Save ().
7. The flag’s information is changed.
Deleting a Flag
When you do not need a flag, you can delete it from the system. When you do, the flag is permanently removed.
To delete a flag, follow these steps.
Note: To remove all flags associated with a specific content item, see Purging a Content Item’s Flags.
1. Navigate to one of these area in the Workarea:
- Smart Desktop > Content Flags
- Settings > Community Management > Flagging > Flagged Content
- Content Reports > Flagging tab for a content item
2. Click either a flag’s content title or the flag’s date.
3. The flag’s detail information appears.
4. Click Delete ().
5. A dialog appears asking you to confirm the deletion.
6. Click OK.


![]()